Week 1 of Coding: Landing Screen 🛬
Implementing the landing screen UI in Flutter


The landing screen is an essential component of any mobile application. It is the first thing a user sees when they open an app, and it sets the tone for their entire experience. Additionally, it can help establish a strong brand identity and create a positive first impression, which is critical for attracting and retaining users in today's competitive mobile app market. This is why it makes sense to start my coding the UI journey with it. So Let's Start 🚀
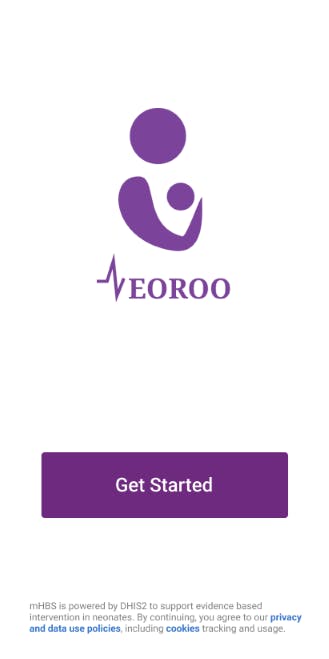
The Design Part
This is the Figma design of the landing screen, it provides a clear and concise overview of the app's features and functionality, while also being visually appealing and easy to navigate.
The Coding Part
to implement this screen we need 3 main components: the image, the button, and the text. but before starting to implement each component, there's one important point that needs to be handled before starting to add widgets, we have to not depend only on the given Figma design dimension. Converting the Figma design dimensions into actual device dimensions is a critical step in implementing a design for a mobile application. It ensures that the design elements are accurately translated into the final product and that the user experience is consistent across different devices. Failure to convert the dimensions correctly can result in elements being too large or too small, leading to poor user experience and potentially even usability issues! that's why I've implemented the conversion methods first:
/// This function is used to convert the xd width to the device width
/// @param xdWidth is the width of the component in xd, @param deviceWidth is the width of the device
double convertXdWidthToScreen({required double xdWidth, required double deviceWidth}) {
  return (xdWidth / 411.0)*deviceWidth; // 411.0 is the device width used in Figma
}

/// This function is used to convert the xd height to the device height
/// @param xdHeight is the height of the component in xd, @param deviceHeight is the height of the device
double convertXdHeightToScreen({required double xdHeight, required double deviceHeight}) {
  return (xdHeight / 823.0)*deviceHeight; // 823.0 is the device height used in Figma
}
Furthermore, different devices have different screen sizes, resolutions, and aspect ratios, which means that designs must be adapted to fit each device accurately. Converting the design dimensions into actual device dimensions also ensures that the layout and spacing of elements are optimized for each device, which can help improve the user experience and make the application more accessible.
The image
To implement this part, I just needed to download the image assets from the Figma design, add the image to the assets folder in the Flutter app, and finally display it as Image.asset widget, as follows:
Image.asset("assets/images/logo.png", width: convertXdWidthToScreen(xdWidth: 169, deviceWidth: deviceWidth),),
The Button
At first, I just used an ElevatedButton with some customization that fits the current screen only, but after looking deeply into the full design, I saw it was a better idea to implement the ElevatedButton just once, then extracting it and making it customizable by adding the necessary parameters for it, such parameters are:
{
    deviceWidth: "the width of the device, used to convert the xd width to actual device width."
    deviceHeight: "the height of the device, used to convert the xd height to actual device height."
    title: "text that will be displayed on the button."
    hasElevation: "a boolean that determines whether the button has elevation or not."
    textSize: "size of the text on the button."
    textColor: "the color of the text on the button."
    buttonColor: "the color of the button."
    onPressed: "the function that will be called when the button is pressed."
    fontWeight: "the weight of the text on the button."
    buttonSize: "the size of the button."
}
and simply, using the new widget like that:
MainButton(deviceWidth: deviceWidth, deviceHeight: deviceHeight,
              title: "Get Started",
              buttonSize: Size(
              convertXdWidthToScreen(xdWidth: 308, deviceWidth: deviceWidth),
              convertXdHeightToScreen(xdHeight: 82, deviceHeight: deviceHeight),
            ),onPressed: () {
              //TODO(Donia): Navigate to Choose Role Screen
            },
            ),
The text
Now, to be able to make some words inside the text hyperlinks, we can't use the text widget directly instead, we need to use RichText, this is originally inspired by this question on StackOverflow: stackoverflow.com/questions/43583411/how-to-create-a-hyperlink-in-flutter-widget, now what remains is the method to launch a URL on clicking on the hyperlink, fo that I've used https://pub.dev/packages/url_launcher dart package:
launchURL2(String uri) async {
Uri url = Uri.parse(uri);
try {     await launchUrl(url,
        mode: LaunchMode.platformDefault
    );
  } catch (e) {
    print(e);
  }
}
Putting it all together
Now I've done making the main 3 parts of the screen, it's time for merging them all on 1 screen, for that I've simply used a Column widget to include them all, and for the vertical spacing, I used a SizedBox and took the height of it from the design by measuring the spacing between components and then converting that spacing using our previously made method convertXdHeightToScreen .
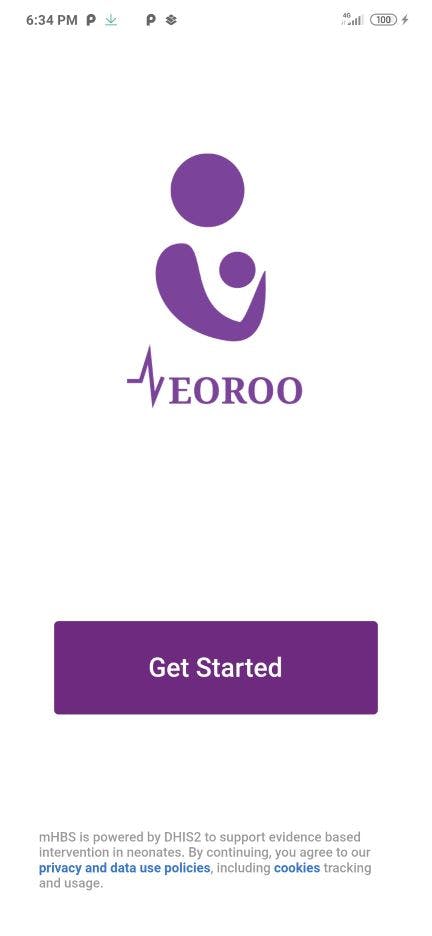
The final outcome:
This is our final output (the screenshot was taken from my phone since I use it for debugging):